
 At Christmas time I decided I wanted to make my own pair of mittens. The set I was using had holes and big amounts of fur around the wrists. I decided I needed a change and that I would like a grey pair of mittens that were knit tightly to keep the wind from getting to my fingers, but were thin and easy to wear.
I couldn't find a mittens pattern online, so I decided to make my own pair. This is relatively easy as long as you know how to knit in the round and are ready to do some trial and error.
For my own mittens I selected a Peruvian Highland wool meant for 6mm needles. I wanted a thicker wool on smaller needles (to help make it 'wind proof') so I used 3 1/4 mm needles.
I have never made mittens before, so I used this pattern to roughly sketch out how I would approach the mittens (and used their method for making a thumb hole). I then had Caleb help me trace my dominant hand on a piece of paper so I could compare my knitting progress with the size I needed.
With those steps complete I then started knitting. Not knowing how big around to make it, I guessed and it seemed to fit around my wrist well. Here are my instructions for making mitts - this should work well if you have long fingers and small wrists. Adapt as necessary when you tackle your own mittens project.
Jess' Homemade Mitten Pattern:
1. Cast on 39 sts.
2. Knit 15 rows.
3. Increase 6 sts even along next row. (Now you'll have a total of 45 sts)
4. Knit 11 rows.
5. Increase by 3 sts evenly across row.
6. Knit 15 rows to thumb.
7. On the next row (where the thumb hole will be), after 32 sts use scrap wool for 6 sts and then continue knitting with regular wool. (Follow these directions for thumb hole.)
8. Knit 25 rows.
9. Start to decrease after the 25th row by 3 sts along the row.
10. Knit 2 rows.
11. Decrease by 6 sts.
12. Knit 2 rows.
13. Decrease by 6 sts.
14. Knit 3 rows.
15. Decrease 3 sts.
16. Knit 6 rows. (Note, I found the end part of my mitts a little too pointy so you might want to skip this step and instead add more rows to step 8.)
17. Using two of the needles, put 15 sts on each needle and prepare to close using the kitchener stitch.
18. Tuck in the pointy corners by turning inside out and looping some yarn in to secure corners. 19. Create thumb.
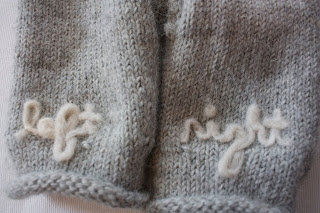
20. If you like, use some wool roving to felt words or patterns into the mitts.
So, that's how I made my mittens. They're not the most gorgeous mitts in the world, but I really enjoy them and find them pretty good for a first pair.
Have you made mittens before? What did they look like? Were they easy to make? Do you have a trick for making mittens (especially the thumbs)? Let me know!
Have you made mittens before? What did they look like? Were they easy to make? Do you have a trick for making mittens (especially the thumbs)? Let me know!


No comments:
Post a Comment